Paint Correction Before and After Explained
If you’ve searched “paint correction before and after” expecting gallery-worthy transformation photos, you’ve found plenty. What most of those posts skip is the process behind the result, the prep work, the tooling decisions, the realistic limits. This guide covers all of that: what correction actually does to your clear coat, which defects it fixes, the full stage-by-stage process, and an honest take on DIY versus professional work.
What Paint Correction Actually Does to Your Car’s Finish
Paint correction removes a thin, controlled layer of clear coat to level the surface. Swirl marks, light scratches, water spots, and oxidation all sit in or near the top of the clear coat, correction abrades that layer flat so defects disappear rather than scatter light.
That process is permanent in one specific sense: the material removed is gone. You are not polishing defects away in the way you’d buff a shoe. You’re levelling the surface around them.
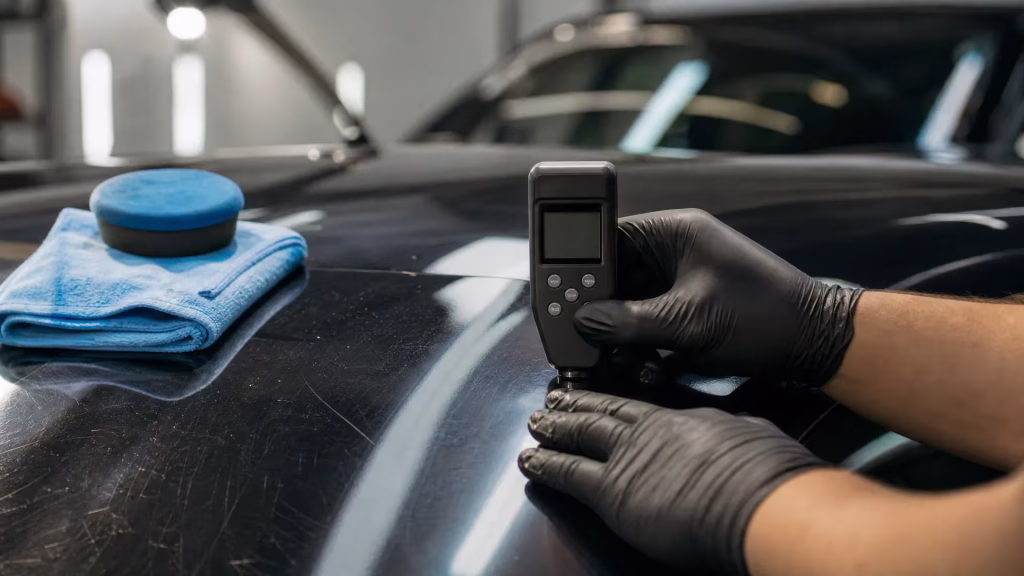
Results depend on three things: how much clear coat remains, how deep the defects run, and how well the technique is executed. Professional detailers measure paint depth with a paint thickness gauge before starting. Most factory clear coats sit in the 100–150 micron range, and the industry standard is to avoid removing more than 10–15% of that total across the vehicle’s lifespan. Run a car through multiple aggressive correction stages and you eventually compromise the protection the clear coat provides.
Set expectations accordingly. Not every car will achieve a mirror finish from a single-stage cut. Dark-coloured vehicles, black, navy, graphite, reveal swirl marks far more visibly than white or silver under direct sunlight. That’s why paint correction before and after photos are routinely shot on dark paint: the contrast is honest and dramatic. It’s also why dark solids are the most demanding to correct and maintain.
Reading the Paint Correction Before and After: What Changes (and What Doesn’t)
Portfolio images are real, but they show optimal outcomes. Multi-stage work on freshly detailed dark paint in controlled lighting looks extraordinary. A single-stage enhancement on a tired daily driver with moderate defects will look meaningfully better, not the same.
Defects paint correction fixes
- Swirl marks, fine circular scratches from poor wash technique or automatic car washes
- Light random isolated defects (RIDs), isolated fine scratches in the clear coat that haven’t broken through
- Buffer trails, holograms left by previous rotary polishing work
- Water spot etching, where mineral deposits have lightly etched the surface
- Light oxidation, faded or chalky clear coat on older paint
- Haze, general surface dullness reducing gloss depth
The distinction between a one-stage enhancement cut and a full multi-stage correction matters here. A one-stage polish improves gloss and removes light defects but won’t eliminate deeper scratches. A two-stage correction, compound first, then polish, removes heavier defects and then refines the finish. Three-stage work adds a dedicated finishing step for maximum gloss.
Defects paint correction can’t fix
- Deep key scratches that cut through the clear coat into base coat or primer
- Stone chips, the impact has physically displaced material, not just scratched the surface
- Rust developing beneath the paint
- Panel dents or structural damage
- Cracks in the clear coat from severe UV damage or age
These require respray, touch-up, or bodywork. No amount of compounding will fill a chip or restore missing clear coat. If correction is applied aggressively over a stone chip, it can widen the exposed area. Know your defects before you start.
Paint Correction Steps: A Stage-by-Stage Breakdown
Decontamination and paint prep
Decontamination is non-negotiable. The single most common DIY mistake is skipping it, working over embedded iron particles or bonded contamination with a machine polisher drags that debris across the paint and introduces fresh scratches rather than removing existing ones.
The sequence:
- Two-bucket or rinseless wash, remove loose dirt
- Iron remover, spray on, allow dwell time, rinse as the solution bleeds purple drawing out ferrous contamination
- Clay bar, mechanical decontamination to lift bonded tar, industrial fallout, and any residual particles the iron remover didn’t dissolve
- Paint thickness gauge check, measure multiple panels before touching a machine polisher; thin paint changes your correction strategy
- Tape off trim and rubber seals, compound residue in door seals is a nuisance; compound on unpainted plastic trim can stain
Only once the paint is fully decontaminated and dried should you move to the polisher.
Choosing your cut: compound vs polish
Compound and polish are not interchangeable terms, they describe different levels of abrasive cut.
Compound contains heavier abrasives. It removes material faster, levels out deeper scratches and swirl marks, and leaves a slightly hazy or holographic finish that needs refining. Use compound for the first stage of a multi-stage correction.
Polish contains finer abrasives (or diminishing abrasives that break down during use). It refines the finish left by compound, removes light defects, and builds gloss. A one-stage job on lightly marked paint may only need polish. A full correction uses compound first, then polish.
Brands like Sonax and CarPro both offer clearly tiered correction lines, heavy cut compound through to fine finishing polish, which makes pairing straightforward once you understand the logic.
Machine polishing technique
Technique matters as much as product choice. Key principles:
- Slow arm speed, move the polisher slowly across the panel, roughly 2–3 cm per second. Rushing reduces dwell time and cuts less effectively.
- Moderate, consistent pressure, let the machine and pad do the work. Pressing hard doesn’t increase cut; it kills pad performance and builds heat.
- Overlapping passes, work in a cross-hatch pattern (horizontal passes, then vertical) to ensure even coverage and avoid leaving lines.
- Small working sections, 40–50 cm squares allow you to work product before it dries out and let you inspect results section by section.
- Inspect frequently, wipe residue off with a microfibre and check under a detailing light or panel light. Correct until satisfied, then move on.
Choosing the Right Machine Polisher for Paint Correction
Random orbital vs rotary: which suits your skill level?
This is the most important equipment decision for a DIY detailer.
A random orbital (dual-action) polisher moves the pad in two simultaneous motions, rotation and oscillation. The eccentric movement dissipates heat and reduces the risk of burning through the clear coat if you pause or press unevenly. It is forgiving, which makes it genuinely beginner-safe. RUPES developed the BigFoot random orbital system specifically to make multi-stage correction safer for operators without rotary experience; the backing plate oscillation pattern is engineered to dissipate heat rather than concentrate it. Their LHR range and the Flex range stocked at Auto-DNA both deliver this.
A rotary polisher spins in a single circular motion. It cuts faster and is more effective on severe defects or very hard paint, but heat builds quickly. Uneven pressure or pausing mid-panel can burn through the clear coat. Rotary work requires experience, it’s not the right starting point for a first correction.
Recommendation: if you’re building your first correction kit, start with a random orbital. Master your technique before considering rotary.
Pad and product pairing
Pad selection maps directly to the compound vs polish decision:
- Heavy cut foam or wool pad, pairs with compound for maximum material removal
- Medium cut foam pad, pairs with a lighter compound or a heavier polish for single-stage work or the second stage of a two-stage correction
- Finishing pad, pairs with fine polish to maximise gloss and remove any micro-marring from earlier stages
- Microfibre pads, faster cut than foam pads of similar grade; useful on hard paints or for one-stage correction where speed matters
Match pad aggression to product aggression. A heavy compound on a finishing pad won’t cut efficiently. A fine polish on a heavy cut pad risks unnecessary material removal.
DIY Paint Correction vs Hiring a Pro: Making the Honest Call
DIY paint correction is viable for an enthusiast willing to invest in quality equipment and put in practice time. It is not viable for someone who wants to skip steps and achieve pro results from a YouTube tutorial and budget kit.
The honest checklist:
DIY makes sense when:
- You have time to practise on a spare panel before touching your car’s paint
- You’re working on a vehicle with measurable clear coat depth remaining
- The defects are light to moderate swirl marks and haze
- You’re prepared to invest in a quality machine polisher, correct pads, and appropriate products
- If you are unsure, always rather consult a Professional Detailer, paying for a Professional Detail is more affordable than damaging the paint and then having to pay for a costly re-spray
Pay a professional when:
- The paint is thin from previous correction or factory application
- The car is a dark solid prone to marring (every wipe shows; every mistake shows more)
- It’s a high-value vehicle heading for ceramic coating and you need the base to be right
- You’ve assessed the defects and they’re on the borderline of correctable vs. beyond correction
Removing swirl marks from a car done poorly can add more defects than it removes. A paint correction done with contaminated pads, wrong product pairing, or excessive pressure leaves holograms, buffer trails, or thin spots. Practise on a bonnet from a breaker before you work on your own car.
Protecting the Result: What to Do After Paint Correction
Correction removes protective layers along with defects, the paint is exposed and vulnerable immediately after polishing. Act quickly.
The process:
- IPA wipe-down, diluted isopropyl alcohol (typically 15–20% in water) removes polish oils and product residue that mask the true finish and prevent coatings from bonding properly. Do not skip this step before applying ceramic coating.
- Apply protection, your options in descending order of durability and effort: ceramic coating, paint sealant, or wax. Ceramic coating delivers the longest-lasting protection and the most hydrophobic performance, but requires careful application and a dust-free environment.
- Allow cure time before exposure to water, contaminants, or washing.
For the full details on what to apply next, the ceramic coating application guide covers product selection and application steps.
Correction is the prep stage. Protection is the goal. A freshly corrected panel left unprotected will begin accumulating defects again from the first wash. Lock in the result immediately.
Ready to build your correction kit? Auto-DNA stocks Flex machine polishers alongside compound, polish, and pad systems from CarPro, and others, everything you need to pair correctly from a single source. Browse the machine polisher and compound/polish ranges on site, or get in touch with the team before you buy if you want product guidance matched to your specific paint type and defect level.
